Table of contents
- Works for 103 languages (including Zulu and Scots Gaelic)
- 100% free
- Has a dark mode :)
Writing words down and coming back to them is one of the key parts of language learning. If you aren’t doing this then you are missing out on one of the best ways of actually remembering phrases, vocabulary, and expressions.
If you don’t want to keep a paper notebook in your back pocket, that’s ok. It is almost the start of the 2020s after all.
So why not have your own, fully customised, vocabulary app on your phone?
This guide will teach you how to create your own bespoke vocabulary app.
It requires zero knowledge of coding, costs nothing, and can take you less than 5 minutes to build and get up and running. If we’re counting, you can actually get it set up in 15 seconds (honestly, we’ve even added a video at the end of this guide in case you didn’t believe it).
It works on Android, iPhone, and any phone browser.
Oh, and yes, it does have a dark mode too.
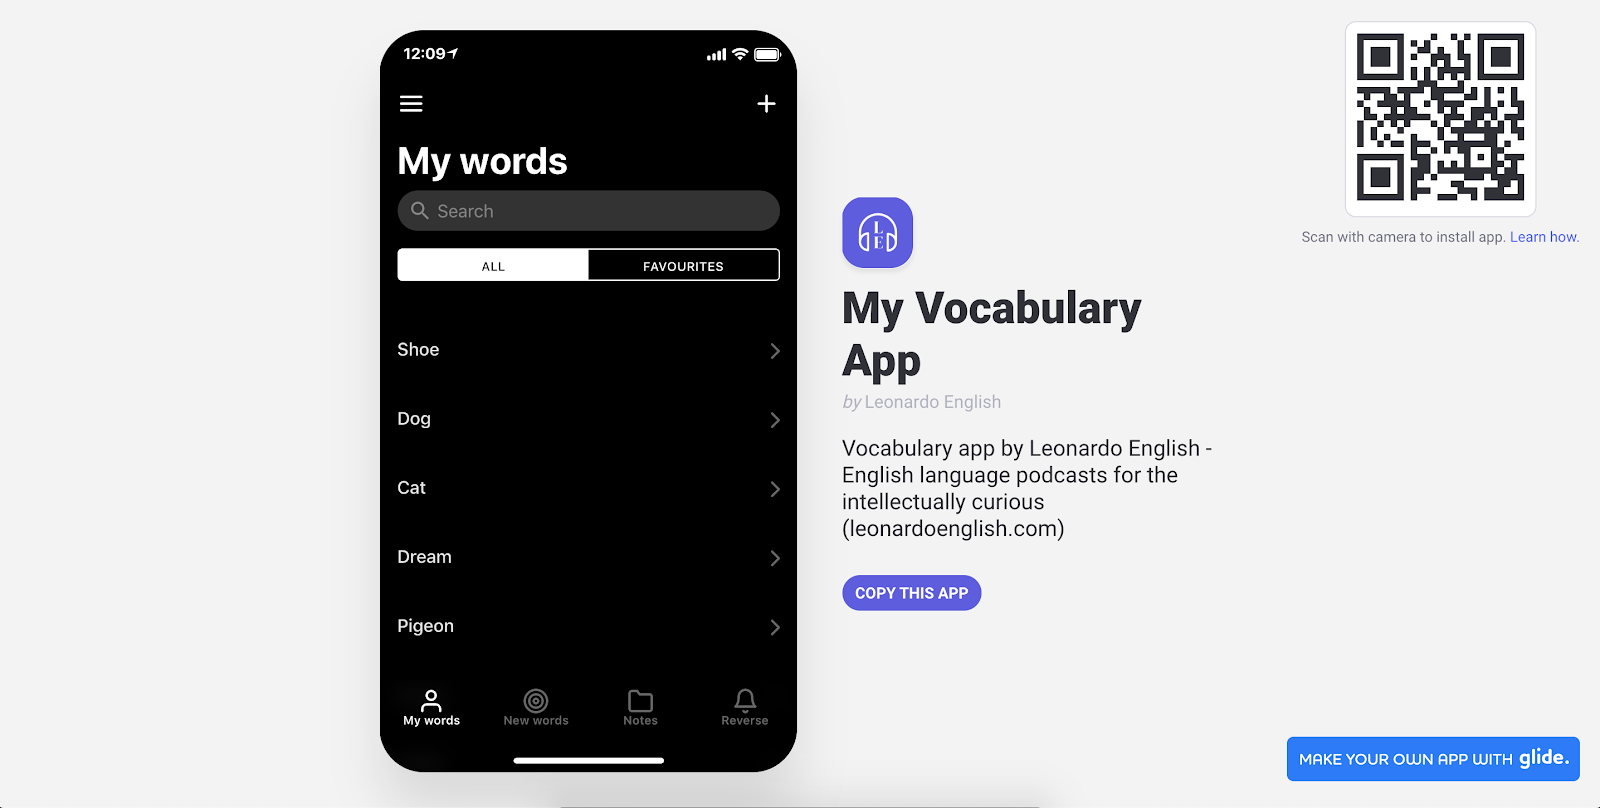
Curious about what it’ll look like? It’ll look like a bit like this.
Ready?
OK, here’s what you will need:
- 5 minutes
- A laptop (just to make the app, then afterwards everything will run on your mobile)
- A Google account (e.g. gmail)
- A Glide account (very simple to set up and free, we’ll show you how)
- Ta da!
If you weren’t sure, here are some things that you won’t need:
- Any prior knowledge of coding
- Any money (or a credit card)
- More than 5 minutes
You’ll be able to build a vocabulary app, personalised to you, that runs only from a Google Sheet (if you don’t know what this is, it’s like a spreadsheet, but one that lives on the internet)
It’ll be accessible 24/7 on your phone, will be customizable to your needs, and will mean that you can note down any word or phrase you hear and test yourself on it later.
Here’s how it works.
It uses something called Glide, which is a really cool tool to allow you to build apps in 60 seconds. And it’s free.
You need to head to this page (note, if you want to copy the app, you’ll need to go to that link on a laptop/desktop. On mobile you will just get the app itself).
It’ll look like this:
Then click ‘COPY THIS APP’
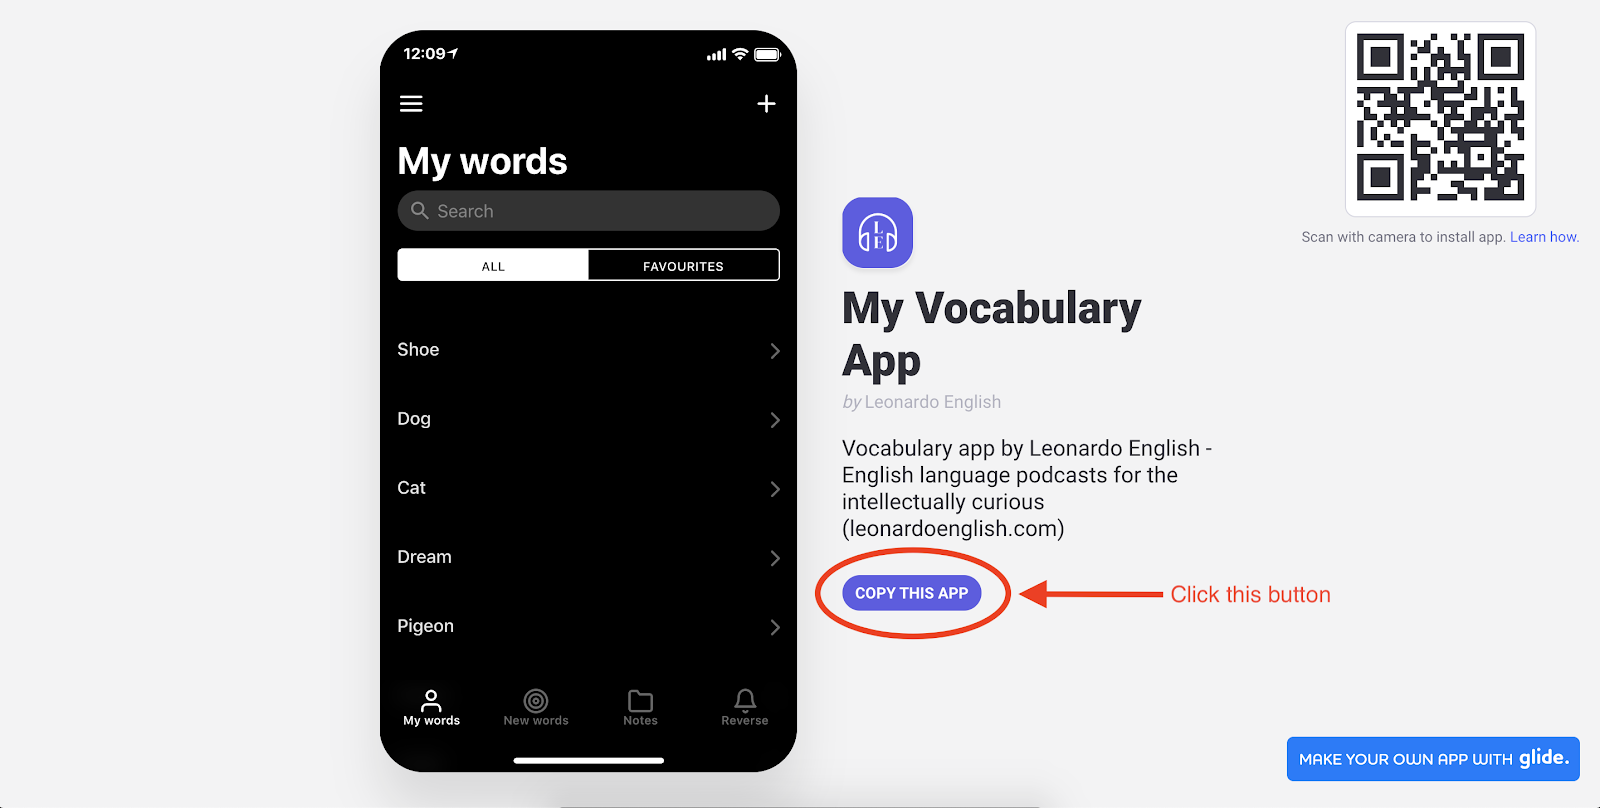
This will ask you to sign up for Glide (using your Google account), and will make a copy of the entire app and the spreadsheet that it runs from.
The spreadsheet will live in your own Google Drive, and so once you have made a copy of the app, it’s yours. You can view and edit the sheet by clicking on ‘Edit Sheet’ in Glide. You don’t need to worry about manually making a copy of the Google Sheet, as this happens automatically when you copy the app.
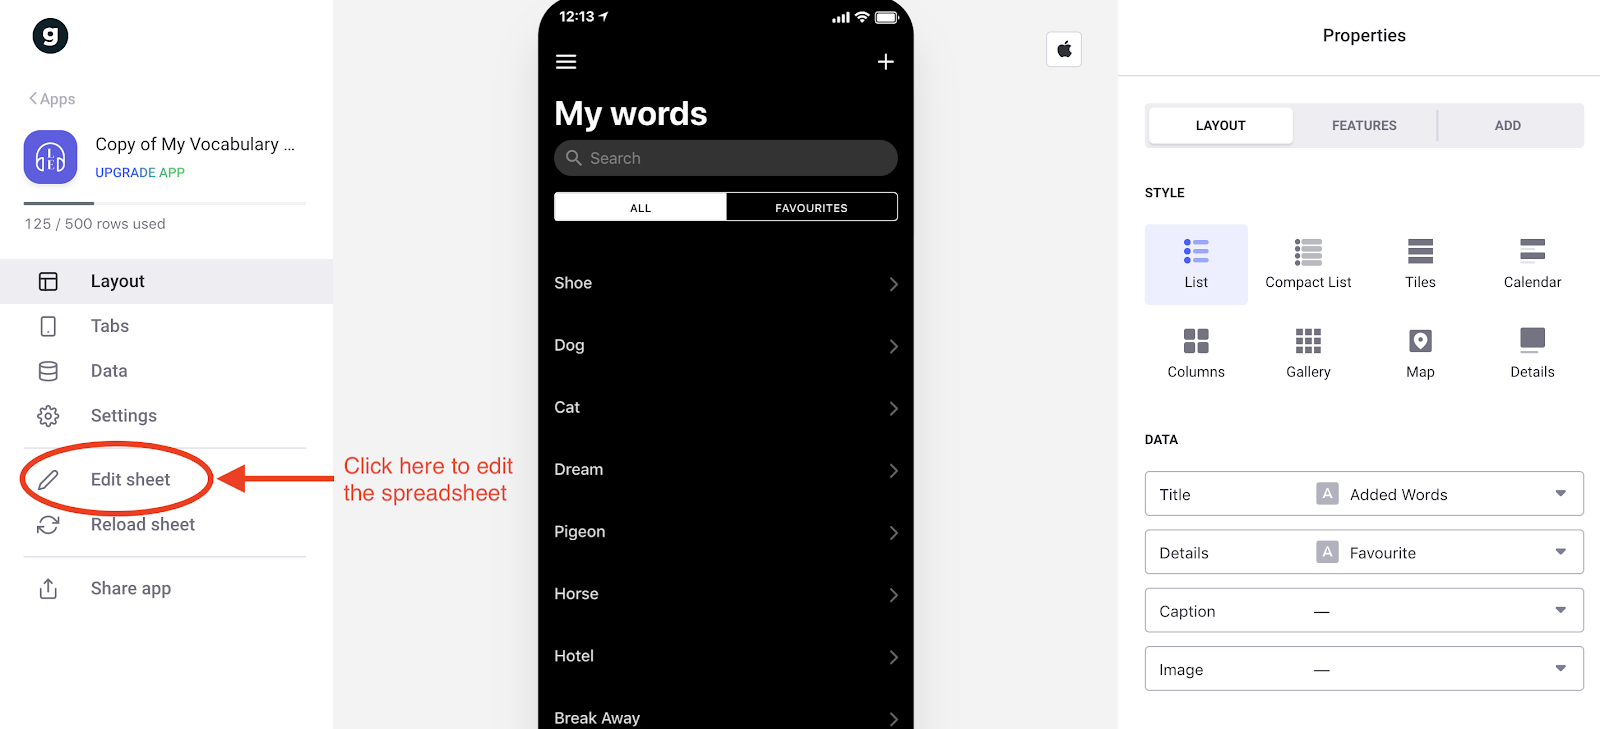
Think of this spreadsheet as a database of where all your vocabulary will live. You won’t need to edit it directly, but it’s where all of your vocabulary is stored.
OK, so if you have got this far, give yourself a little pat on the back. That’s actually it, you now have your own completely customisable vocabulary app. See, we told you that really wouldn’t take long.
Now, we’ll go into how the app actually works, and how you can customize it.
The app has 4 tabs
1. My Words
This tab shows all of your words, regardless of whether you have marked them as ‘remembered’ or not. It is sorted by the date that the word was added, but you can change this yourself.
You can tap on any of them to get to the definition of the word.
The definition is pulled straight from Google Translate (so you don’t need to add it manually).
Each word has a ‘notes’ option, so you can add your own personal notes to the word. You might want to leave yourself a note on how you first heard it, or some uses of that word or phrase in a sentence. You can write whatever you want in there.
You can edit everything at any time, so don’t worry too much if you need to change something, or add in more text later.
Each word has the option to mark it as ‘remembered’, and also to mark it as a ‘favourite’.
This is how I use it:
Mark words as remembered when you are confident that you now remember them. This means that they won’t come up in the list of ‘new words’ that you can use to test yourself.
Mark words as ‘favourite’ when you want to keep them handy to use in conversation or writing. This is a useful way of keeping track of words that you like, or that you want to practice.
Marking words as ‘favourite’ requires you to login, but this is very easy - you will be prompted to do so within the app, and then your ‘favourite’ words will come up as an option in the ‘My Words’ tab.
2. New words
This is exactly like ‘My words’, but just shows all of the words that are not marked as ‘remembered’.
As you add more and more words, the ‘My words’ tab will get longer and longer, and so this tab will come in handy to help categorise things.
3. Reverse
This tab is exactly like ‘My Words’, but instead of showing you the definition in language 1 (English, in this example), it shows you the definition in language 2.
For example, ‘My Words’ would show ‘Dog’, and tapping on it would reveal the translation (in Spanish, in this example), which is ‘Perro’.
The ‘Reverse’ tab just shows ‘Perro’, and tapping on it would reveal ‘Dog’.
Any language student worth their salt knows that it’s important to be able to go both ways, and so this tab allows you to check you can.
4. Notes
This is a section for you to add specific note relating to phrases, expressions etc.
This is different to the ‘My Words’ page, as it’s intended for you to add longer expressions. As the vocabulary in ‘My Words’ is automatically translated by Google Translate, the ‘Notes’ section here allows for longer expressions. It isn’t automatically translated.
For English learners, this would be a good place to add rules about things like your beloved phrasal verbs, turns of phrase, slang, and things that are a little more complicated than just a word and its translation.
Adding your own words
To start off, you should delete the words that are in the copied version of the app. These are just examples to show you how it can work.
You can delete them by selecting a word, tapping ‘edit’, then ‘Delete item’. Easy.
You can then just add a new word every time that you come across one.
Add the wording a word is easy, you just tap on the ‘+’ sign on the top right.
When you are adding a new word you can also add a note, if you would like to do that. It’s not required, and you can come back to that afterwards.
And that’s it. The translation will be done automatically by the Google Sheet. As will the ‘date added’.
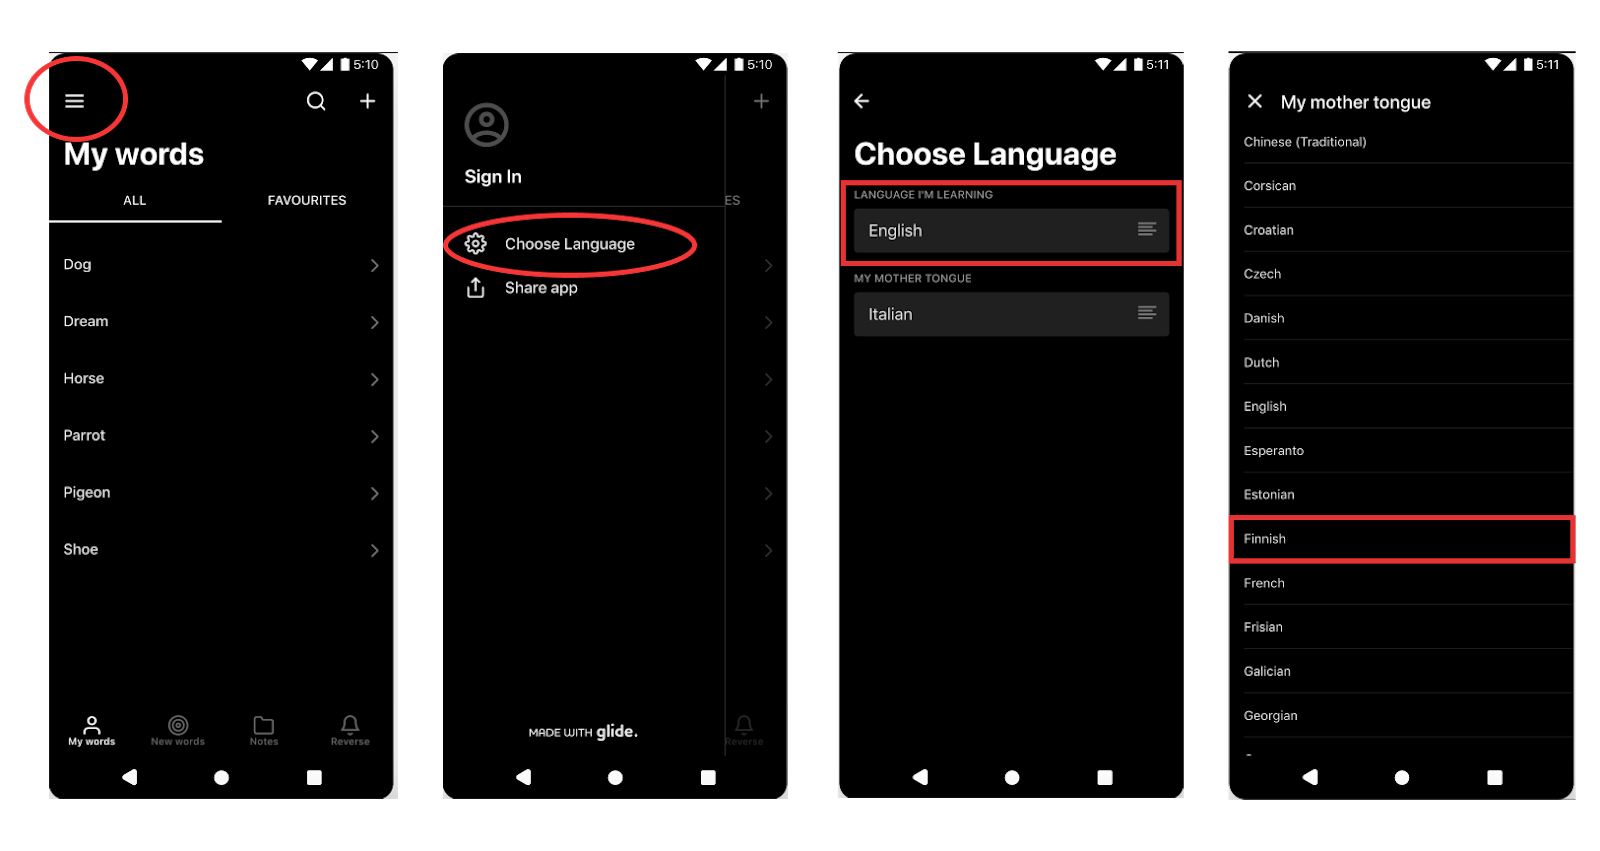
If you’re not a Spanish speaker learning English, then you will also want to change the language options in there. This is really easy.
“Language learning” is the language you are trying to learn.
“Mother tongue” is the language that you want the definition to be in.
In terms of actually using the app, there are a few ways you can access it.
On the browser (requires an Internet connection). You can customise the URL on the ‘Share’ Tab (see below). Then you can just access the app through that URL (note, anyone else can access it as well, unless you change the privacy settings).
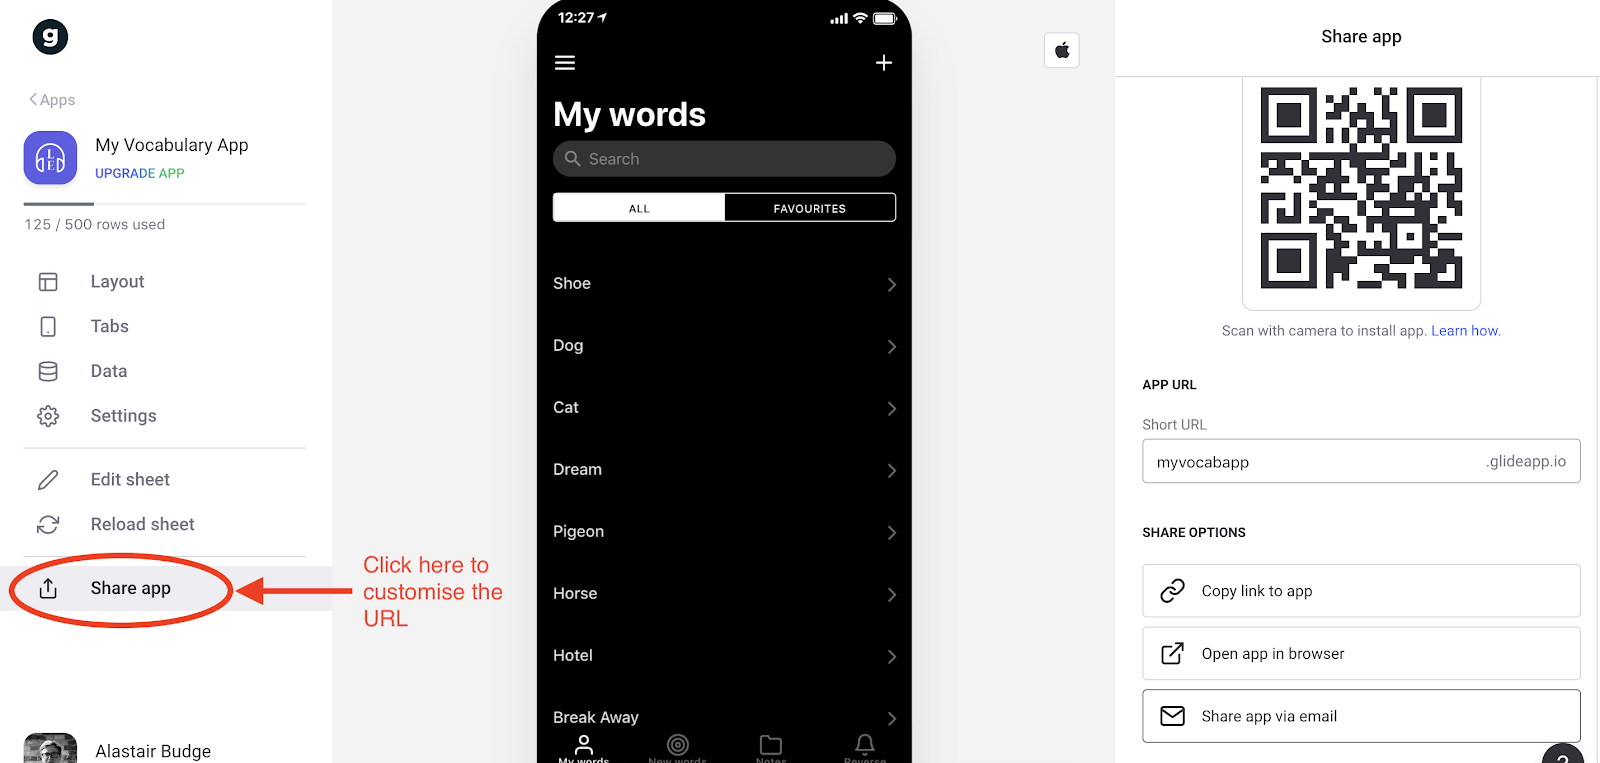
While it’s possible to continue to access it only in your browser, you can actually send it to your phone with just a couple of taps. See the instructions here from Glide on how to do this.
Personally, this is what I’d recommend, as it will work exactly like any other app on your phone, and mean it’s just a tap away for whenever you need it.
And that’s it!
While it may, on one level, seem like a basic vocabulary app, it has everything that you actually need in there.
The best bit? It’s completely customisable. This is just one set-up of the app. You can add more tabs, you can customise it to be however you want it.
It’s completely up to you, but here are some of the ways you might want to customise it:
- You could categorise each piece of vocabulary using the choice component
- You could add additional languages to the app (if you are learning multiple languages).
- You could add images and video to show how these words and phrases are used by native speakers
- You could embed parts of podcasts in there (using the audio component)
- Make you’d like to give each word a more advanced categorisation than just ‘remembered’ or ‘not remembered’
- (Advanced) You could add to the Google Sheet to add a column with a date when a ‘remembered’ word should appear in the app again
- If you’re a teacher, you might want to distribute this to students and upload new pieces of vocabulary each week. Each student can have their own login to mark ‘favourite’ words.
- Of course, you can change the styling, or anything else about the app.
You don’t need to know all this for the app to function, but if you want to make any changes, it’s useful to know how the Google Sheets works.
- Tab: Language Pairs - this is where you can change the language pairs, as described above.
- Tab: Vocab - RAW - this is where the added vocabulary goes, along with any notes that you add. When you mark a piece of vocabulary as ‘Remembered’, or ‘Favourite’, it’s stored in here.
- Tab: Vocab with translation - this worksheet just copies the inputted vocabulary from the previous tab, and then adds the translation and the created date. If you are familiar with Google Sheets, this will be familiar to you - it’s just using a Google Translate formula within the cell. If you aren’t familiar with Google Sheets, you can either read up on what is happening here, or just be happy that this is where your vocabulary gets translated into the language you want it to be.
- Tab: Vocab notes - this is where your vocab notes are stored.
- Tab: Language pairs (ISO) - this is where your language preferences are stored.
- Tab: Language Options (ISO) - this is where the options are stored for the languages.
You can also check out the video walkthrough here:
Got questions, thoughts, feedback? Hit us up at hi@leonardoenglish, Instagram or Facebook
Happy vocab learning, and congratulations, you have just built a functioning app :)


![10 Activities to Improve Your English Vocabulary [Self-Study Guide #6]](https://cdn.prod.website-files.com/5d70d85d6d5a384776dc97e4/681a06bf554696567c83d41c_636d162c0a5e0fca0fd9959d.webp)